13 December
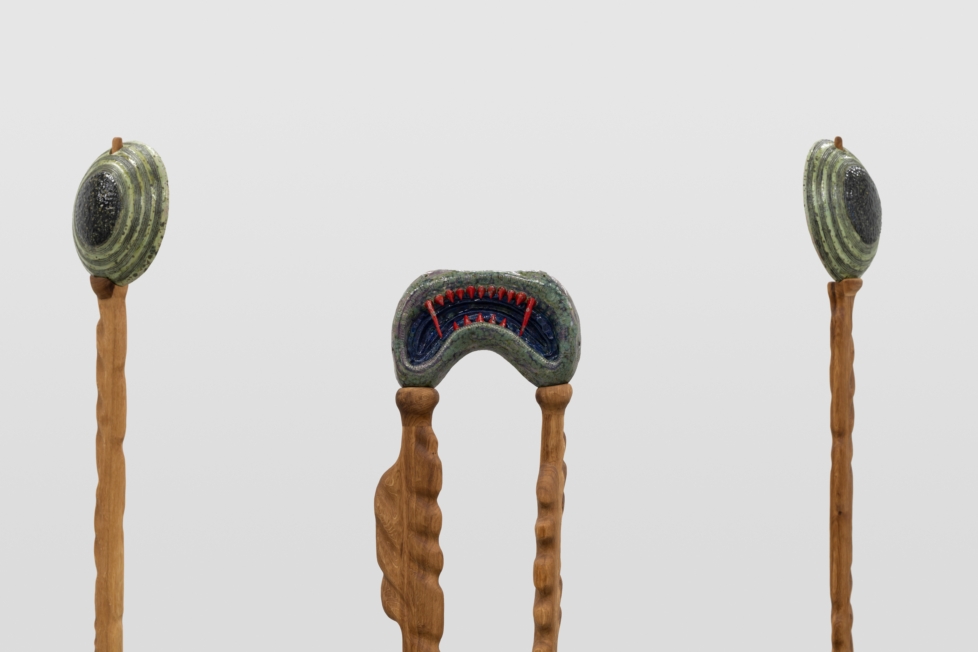
This year, artist Tue Greenfort found shelter at a biennial in the far north.
In the text field, verify the game name. This is the title that will display on your PS2 console menu, so keep it clean and accurate. Under the media type options, select or DVD . Click the Create button to start the process [1]. Step 5: Finalizing the Process
This public link is valid for 7 days and shares a thread, including any personal information you added. This link or copies made by others cannot be deleted. If you share with third parties, their policies apply. Can’t copy the link right now. Try again later.
USBUtil 3.0 is a popular Windows-based utility used by the PlayStation 2 (PS2) homebrew community to manage and install games onto USB storage devices for use with Open PS2 Loader (OPL)
Safely eject the USB drive from your PC and plug it into one of the USB ports on the front of your PS2. Power on your PS2 and boot into . Launch Open PS2 Loader (OPL) .
: Excellent for downloading cover art and fixing naming issues, though it typically handles standard ISOs rather than split files .
USBUtil 3.0 is not a general-purpose ISO burner. It serves three essential roles for the PS2 homebrew ecosystem:
Select the root directory of your formatted FAT32 USB drive. Step 4: Convert and Split the ISO
For decades, retro gaming enthusiasts have used this utility to bypass the storage limitations of the PS2 console, allowing them to play their favorite gaming backups directly from external hard drives or flash drives [1].
Once the interface opens, click on in the top left corner.
While Usbutil 3.0 offers significant advantages, there are challenges and considerations:
Look at the field. You can rename the game here; this is how it will appear on your PS2 screen.
: Plug the drive into the PS2 and use a homebrew application like Open PS2 Loader (OPL) to launch the games. Technical Limitations USB 1.1 Speeds : Even if you use a high-speed USB 3.0 drive , the PS2 hardware is limited to USB 1.1 ports


In the text field, verify the game name. This is the title that will display on your PS2 console menu, so keep it clean and accurate. Under the media type options, select or DVD . Click the Create button to start the process [1]. Step 5: Finalizing the Process
This public link is valid for 7 days and shares a thread, including any personal information you added. This link or copies made by others cannot be deleted. If you share with third parties, their policies apply. Can’t copy the link right now. Try again later.
USBUtil 3.0 is a popular Windows-based utility used by the PlayStation 2 (PS2) homebrew community to manage and install games onto USB storage devices for use with Open PS2 Loader (OPL)
Safely eject the USB drive from your PC and plug it into one of the USB ports on the front of your PS2. Power on your PS2 and boot into . Launch Open PS2 Loader (OPL) . Usbutil 3.0 Ps2
: Excellent for downloading cover art and fixing naming issues, though it typically handles standard ISOs rather than split files .
USBUtil 3.0 is not a general-purpose ISO burner. It serves three essential roles for the PS2 homebrew ecosystem:
Select the root directory of your formatted FAT32 USB drive. Step 4: Convert and Split the ISO In the text field, verify the game name
For decades, retro gaming enthusiasts have used this utility to bypass the storage limitations of the PS2 console, allowing them to play their favorite gaming backups directly from external hard drives or flash drives [1].
Once the interface opens, click on in the top left corner.
While Usbutil 3.0 offers significant advantages, there are challenges and considerations: Click the Create button to start the process [1]
Look at the field. You can rename the game here; this is how it will appear on your PS2 screen.
: Plug the drive into the PS2 and use a homebrew application like Open PS2 Loader (OPL) to launch the games. Technical Limitations USB 1.1 Speeds : Even if you use a high-speed USB 3.0 drive , the PS2 hardware is limited to USB 1.1 ports
This year, artist Tue Greenfort found shelter at a biennial in the far north.
Kunstkritikk’s Abirami Logendran shares three art encounters that stayed with her this year.
Art critic Nora Arrhenius Hagdahl recalls this year’s magical Narnia moments.